
티스토리 뷰
팀 프로젝트로 앱을 만들어서 앱스토어 심사를 받았는데 다음과 같은 문제로 심사를 통과하지 못했다.
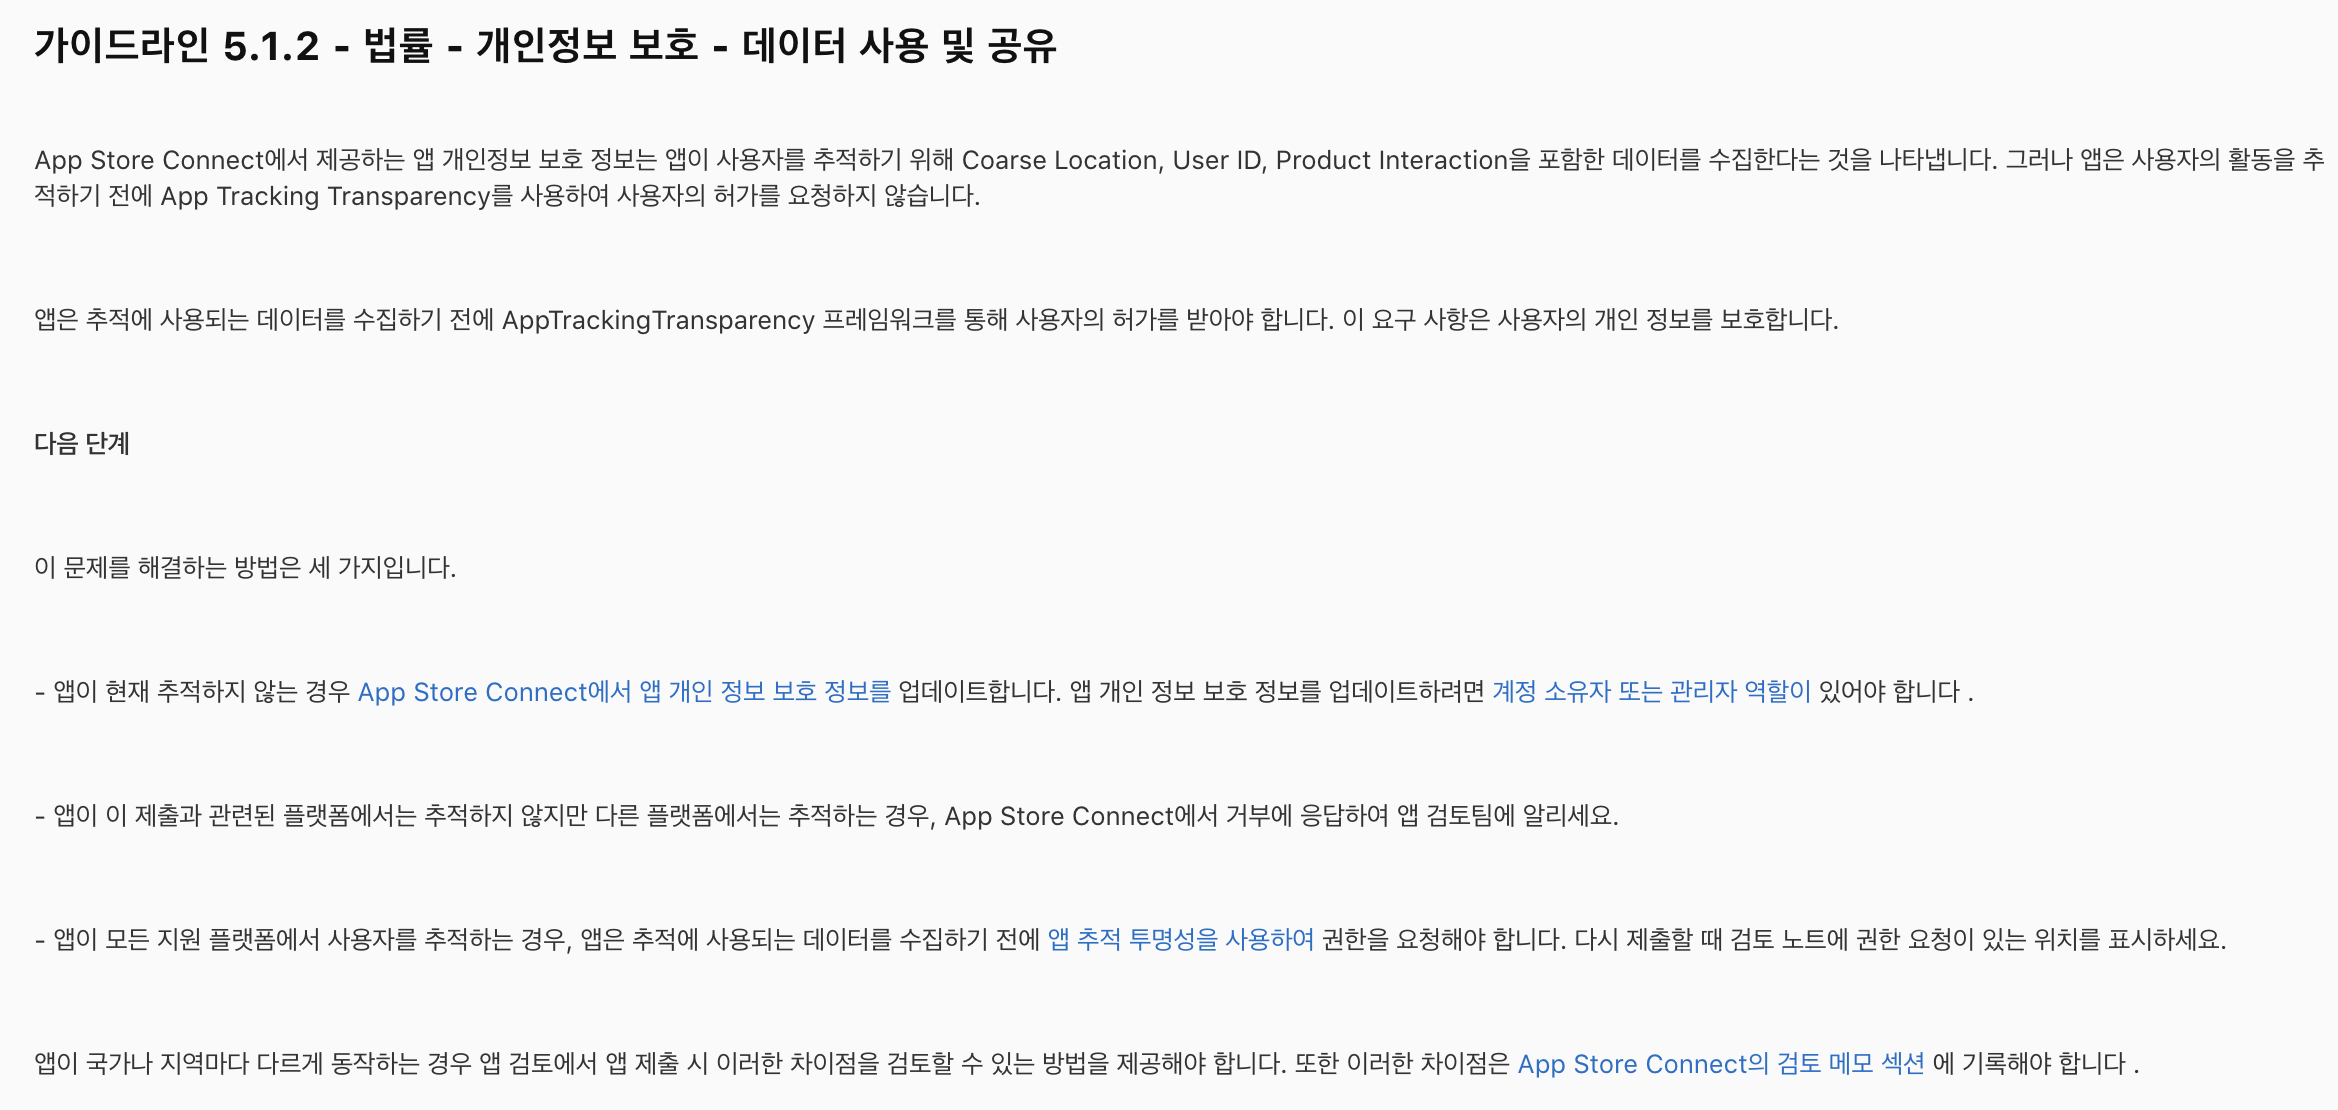
원인을 찾아보니 Google Analytics로 사용자의 행동을 추적하고 있었는데 사용자의 동의 없이 사용자의 행동을 추적하는 것이 문제라고 한다.
그래서 한번쯤 다들 봤을 앱 추적 권한 요청을 사용자로부터 받아야한다.
바로 이거다. ㅎㅎ

1. 권한 설정
1️⃣ info.plist 파일에 권한 설정
info.plist의 key 값에 Privacy - Tracking Usage Description을 추가하고, value에는 권한을 요청할 때 사용자에게 보여줄 하단 문구를 입력한다.
(~이(가) 다른 회사의 앱 및 웹사이트에 걸친 사용자의 활동을 추적하도록 허용하겠습니까?) 상단의 이 문구는 고정이라서 수정할 수가 없다.
나는 하단 문구에 "더 나은 맞춤 서비스와 콘텐츠 제공을 위해 사용되며, 서비스 이외의 목적으로는 사용되지 않습니다."를 추가했다.

2. 상황에 따라 추적 권한 요청 처리
import AdSupport
import AppTrackingTransparency
추적 권한 요청을 받기 위해 import 해야한다.
1️⃣ 앱 실행하고 바로 권한을 받고 싶은 경우
앱 실행하고 바로 권한 요청을 받고 싶다면, AppDelegate에서 처리해야한다.
application 메서드에서 requestTrackingPermission()를 실행하여 추적 허용 여부에 따라 권한 요청을 받도록 구현하였다.
status 상태는 4가지이다.
- .authorized => 추적 허용한 경우
- .denied => 거부된 경우
- .notDetermined => 결정되지 않은 경우
- .restricted => 제한된 경우
class AppDelegate: NSObject, UIApplicationDelegate {

    /// 앱이 켜졌을 때
    func application(_ application: UIApplication, didFinishLaunchingWithOptions launchOptions: [UIApplication.LaunchOptionsKey: Any]? = nil) -> Bool {
        requestTrackingPermission()
        return true
    }

    private func requestTrackingPermission() {
        let status = ATTrackingManager.trackingAuthorizationStatus

        if status == .authorized {  // 추적 허용된 경우

        } else if status == .notDetermined {  // 추적 허용 결정되지 않은 경우
            ATTrackingManager.requestTrackingAuthorization { newStatus in //권한 요청
                if newStatus == .authorized { // 추적 허용된 경우

                }
            }
        }
    }
}
2️⃣ 앱 실행하고 다른 권한 요청 받은 후 추적 권한 요청 받고 싶은 경우
앱 실행하고 알림 설정 요청을 먼저 받은 후, 추적 권한 요청을 받고 싶은 경우 처리방식이다.
AppDelegate의 application()메서드에서 requestTrackingPermission()이 아니라 setupNotification()을 실행하면 된다.
setupNotification()내부에서 알림 요청을 받은 후 1초 뒤 앱 추적 권한 요청을 받는 requestTrackingPermission()함수를 실행한다.
class AppDelegate: NSObject, UIApplicationDelegate {

    /// 앱이 켜졌을 때
    func application(_ application: UIApplication, didFinishLaunchingWithOptions launchOptions: [UIApplication.LaunchOptionsKey: Any]? = nil) -> Bool {
        setupNotification(application)
        return true
    }

    /// 🔔 **알림 설정**
    private func setupNotification(_ application: UIApplication) {
        UNUserNotificationCenter.current().delegate = self
        let authOptions: UNAuthorizationOptions = [.alert, .badge, .sound]

        UNUserNotificationCenter.current().requestAuthorization(options: authOptions) { granted, error in
            if granted {
                Log.info("알림 허용됨")
            } else {
                Log.info("알림 거부됨")
            }

            if let error = error {
                Log.error("Error requesting notification authorization: \(error.localizedDescription)")
            }

            // 알림 요청 후 1초 뒤 앱 추적 권한 요청 실행
            DispatchQueue.main.asyncAfter(deadline: .now() + 1) {
                self.requestTrackingPermission()
            }
        }
    }
 }
그럼 아래 로직이 실행되면서 권한 상태에 따라 사용자에게 권한 요청이 간다.
private func requestTrackingPermission() {
    let status = ATTrackingManager.trackingAuthorizationStatus

    if status == .authorized {  // 추적 허용된 경우

    } else if status == .notDetermined {  // 추적 허용 결정되지 않은 경우
        ATTrackingManager.requestTrackingAuthorization { newStatus in //권한 요청
            if newStatus == .authorized { // 추적 허용된 경우

            }
        }
    }
}
3️⃣ 특정 화면에서 앱 추적 권한 요청을 받고 싶은 경우
앱 실행한 경우 바로 실행하는 것이 아니라 특정 화면에서 앱 추적 권한 요청을 받고 싶은 경우 처리방식이다.
로그인한 후 메인화면으로 들어온 경우 바로 앱 추적 권한 요청을 받고 싶다면, MainView의 onAppear에서 requestTrackingPermission() 함수를 실행하면 된다.
struct MainView: View {
    var body: some View {
        VStack {
            Text("Hello, SwiftUI!")
                .font(.largeTitle)
                .padding()

            Button("Tap Me") {
                print("Button tapped!")
            }
        }
        .onAppear{
            requestTrackingPermission()
        }
    }
}
아니면 로그인 성공했다는 로직에서 requestTrackingPermission() 함수를 실행해도 된다.
func login() {

    // 로그인 로직

    if successLogin {// 로그인 성공한 경우
    	requestTrackingPermission()
    }
}
'스위프트 > SwiftUI' 카테고리의 다른 글
| [SwiftUI] - NavigationLink에 LazyView 적용 (0) | 2025.04.05 |
|---|---|
| [SwiftUI] - Tuist 설치 및 프로젝트 적용 (0) | 2025.03.20 |
| [SwiftUI] - WebView 구현하기 (0) | 2024.12.02 |
| [SwiftUI] - 텍스트에 따라 너비, 높이 동적 조절 (1) | 2024.10.12 |
| [SwiftUI] - TabView 렌더링과 LazyView 사용법 (0) | 2024.09.29 |